
Red arrow shows the location of the keel bushings and the retaining bolts.
Swing Keel Inspection
Back to Keel Maintenance Back to Completed Projects Home
| Disclaimer |
| This web page briefly describes my keel maintenance project, but NOT in sufficient detail as to be an instructional guide on keel maintenance. The National Catalina 22 Association ( www.catalina22.org ) provides some material on keel maintenance and restoration that is instructional in nature. |
"This Old Keel". . . The Keel had not been maintained in who knows how many years, and I thought that I would lower it to take a look and fix it up a bit. I went to losen the bolts; there are two bolts in the port & starboard keel bushings - four bolts total. The bolts on the starboard side came out without too much hassle. As for the port side, the first bolt came out too easily and was obviously stripped. The second bolt would not budge and finally snapped under the excessive torque I placed on it.
|
| Cut-away Diagram of
Swing Keel Assembly Red arrow shows the location of the keel bushings and the retaining bolts. |
|
| Keel Plan From Catalina Yachts |
Fixing the Problem . . . I figured that I would have to use a helix coil to repair the stripped threads, and needed to drill out the remains of the snapped bolt. The good news was that the keel pivot pin was in good shape, showing virtually no signs of wear (below right). The keel trunk was in great shape as well - all rather miraculous, considering it was used in salt water.
What would be needed was to repair the threads and apply epoxy to the rough areas of the keel and then fair it smooth. I set up a drill press underneath the boat and went to town on the remains of the snapped bolt. I also built a brace to hold the keel while I worked on it. This brace fits into the trailer frame.
 |
| (1)Picture of Bushing and Three-and-a-Half Bolts, (2) View of The Keel Pin. |
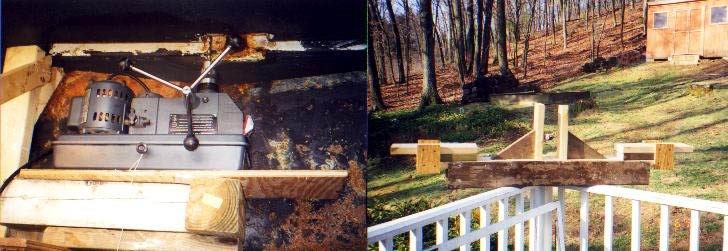 |
| (1) Picture of Drill Press Set up to drill out the broken bolt, (2) Picture of Keel Brace. |
I removed the remains of the broken bolt, and in doing so drilled into the existing threads, as the drill bit drifted. I would have to over bore this hole and place a helix coil in it, as well, in order to bring it back to its original 5/16" size. Looks like I am going to Helix Coil both port side holes.
Going from Bad to Worse . . . I got a helix coil kit from the local automotive supply, which included a tap (to cut the oversized threads) and some helix coils (to bring the threads back to 5/16". I bored both holes (the stripped hole and the one with the snapped bolt) and then used the tap to cut new threads. I threaded the left rear first, and everything went OK. As I was threading the left front, and almost done - the tap snapped !!! - Oh boy. At that point, it seemed like I had gone full circle and was back where I started.
Now What ? . . . I was now a little out of my league as to what to do about the broken tap. The tap had broken because it bottomed out in the hole; meaning the tap was all the way in there. The 'weldments' that the bolts thread into are only 3/4" in diameter, so drilling the tap out was not an option. If I tried, I would most likely destroy the weldment altogether.
After a little research, I found that the way to remove a broken tap is to use a special tool call a "Tap Extractor". These tools are available through industrial supply companies. I ordered the appropriate Tap Extractor over the Internet, which arrived a few days later.
It took a little muscle and an extra set of fingers for the tool, but finally the broken tap was removed. I then completed the second helix coil and the new threads were now ready.
I applied a quick sanding to the keel (given that I was now running out of weekends to work on the keel), coated it with Zinc paint and then painted it with bottom paint. I then re-assembled the keel into the boat and torqued the bolts (20 ft-lbs). I used "locktite" on the bolts to prevent them from coming loose. As an added measure of safety, prior to putting the boat in the water (for the season) I made sure the bolts would not come loose by applying epoxy around the bolt heads. Next winter, I can loosen the bolts again by just chipping away the epoxy to expose the bolt heads.
Technical Information Sources
I found two very good sources of information for the Catalina 22 Swing Keel: